Tuesday, March 6, 2012

Bob's Fried Rice

My dad is a pretty good cook, and he is one of those cooks who LOVE to share their recipes and abundant meals with others, which makes him the best kind of cook there is. He also cooks meals for an ARMY so this is a great recipe for a gathering of lots of people, or for a smaller family if you want to freeze a couple bags and have some to pull out and thaw for a later mean without all the fuss of making it. This is one of my husband's favorites of his recipes, as my hubby loves oriental food. So here is my dad's yummy fried rice recipe :)


You will need:
6 green onions diced cross wise in 1/4 in pieces
1/2 cup teriyaki sauce
1 tbsp minced garlic (equaling about 4-5 cloves)
1 tsp black pepper
1 1/2 cups shredded carrots
1/2 small head f cabbage
3 tbsp olive oil
1-2 tbsp sesame seeds
1-2 cups frozen green peas (thawed)
1 tsp powdered ginger
1 sm bag real bacon bits
3-4 eggs
4-6 cups freshly cooked rice (still hot)

Make sure you have all your vegetables chopped and/or prepared before you start cooking.

The cabbage head needs to be cut in half, lain cut side down, and sliced in long strips from top to bottom about 14 inch wide maximum. Cut those in half cross wise.

Scramble up the eggs.
Cook the rice in another pan or rice cooker.

Put the olive oil in your wok and bring it up to high heat. Add in your rice and your teriyaki sauce, and let those simmer together in the wok for a few minutes. Add in your eggs and all veggies, spices and seeds. Fry these up, stirring constantly for several minutes.

Your fried rice is ready to be served! It's that simple. Chopping all the veggies is the hard part.

Herbed Biscuits

Get ready to be excited! This is a healthy biscuit recipe and at the bottom I will be including the nutritional information!
Assuming you follow the sizing directions, you may feel free to enjoy more than one of these yummy dinner biscuits, guilt-free.

You will need:
2 cups white flour
1 tbsp white flour (for your work surface, not to mix with)
1 tbsp baking powder
1/2 tsp baking soda
1/4 tsp salt
1/4 tsp dried thyme
1/4 tsp dried basil
1/4 tsp crushed, dried rosemary
1/4 cup margarine
3/4 cup + 2 tbsp original or unsweetened soymilk

Combine all dry ingredients (except 1 tbsp flour) in medium mixing bowl. Mix in margarine with blender till crumbly. If you grab a hand full with your hand, you want it to hold its shape while still, but fall apart when you move your hand a bit.

Add milk, mixing with a fork until moistened. Sprinkle 1 tbsp of flour onto your kneading surface to prepare to roll out your dough. Knead 4-5 minutes and then into a large round 1 inch think sheet.

Cut into 2 in rounds. I used the end of a sippy cup because it's all I had that was round and 2 inches across. You can use whatever, it doesn't really matter, just cover the tip in flour so your dough doesn't stick to it.

Place the dough rounds, sides touching, on a ungreased baking sheet. Bake at 400 degrees for 10 minutes. This whole recipe makes about 1 1/2 dozen biscuits.


Serve with your favorite soup or as a side for your favorite dinner dish. These may even add a kick to your Saturday morning breakfast meal as the spices add great flavor, but are not over-powering.
Either way, enjoy!

Nutrition facts:
(per biscuit)
83 calories
2.7 g fat
1 mg cholesterol
122 mg sodium
12 g carbohydrates
.4 g fiber
2.3 g protein


Sunday, February 5, 2012

Yes, it's Another Non-Dairy Chocolate Chip Cookie Recipe :)

I got the idea for this non-dairy recipe from Apple A Day Blog. They have a TON of yummy recipes over there.
These cookies are chewy, and delightfully tasty, the only difference between the two recipes is that on has dairy, one does not. I basically just used different ingredients for the same exact recipe. They turned out delicious, of course :)
You will need:
3/4 cup Earth Balance Natural Buttery Spread
(or you favorite non-dairy butter alternative)
3/4 cup Brown sugar
1/4 cup granulated sugar
2 tsp real vanilla extract
1 egg (or 2 tbsp corn starch + 1 tbsp water, for vegans)
2 tsp corn starch
1 tsp baking soda
1/2 tsp salt
2 cups all purpose flour
1 cup non-dairy chocolate chips
Preheat your oven to 350.
Mix your sugars together with your softened butter sub, till smooth.
Add in your egg and vanilla and mix well.
Slowly add in your flour, corn starch, baking soda, and salt.
^Your dough should look like this. It's very fluffy and tasty.
^I use these chocolate chipos because they don't cost an arm and a leg, they taste delicious, melt well, and are both dairy and gluten free.
Drop dough by the half tablespoon onto an ungreased cookie sheet.
Bake 8-10 minutes or until the edges start to brown. Do not bake longer than 10 minutes.
When using a butter substitute, or even plain margarine for that matter, your cooked cookies will come out looking different than normal cookies that were cooked using butter (dairy) or shortening (gag)
So don't freak and think you did something wrong or left something out when your cookies don't look right. You made them perfectly :)
This recipe makes about 3-3.5 dozen cookies, depending on how much of the dough you eat...
(guilty conscience)
Enjoy your yummy cookies!!!

Wednesday, February 1, 2012

Soy Ice Cream in a Bag

Tonight I made a very yummy dinner and afterwards I really wanted a bowl of ice cream, but as it turns out, we have no ice cream. Sad face :(
So I was playing around on Pinterest (as I usually do at night while my husband gets his zombie fill from Call of Duty) and I suddenly remembered a blog entry I'd repinned a few ago. Light bulb!!
Let's have a look, shall we? If you would so kindly click here? Thanks :)
Amazing right? I mean, who's the genius who invented ice cream in a friggin' bag?!
Are you being flooded with memories of science experiments from your freshman or sophomore year of high school? Because I totally remember doing this. Please don't say I'm the only one...
Anywho, I decided that, for my sweet husband's sake, I would try out a non-dairy version of this recipe, using what I had in my fridge. (We don't buy regular milk products (except cheese, can't live without my cheese!) because everyone but me is allergic to dairy.)
So I made up my own version of this recipe and IT IS DELICIOUS!! Seriously, I'm sitting here taking bites right now in between sentences. Hehe ;-)
So here's my version of this recipe. I hope you enjoy the late night snack you're about to go make. (Once you figure out how easy this is and realize you already have all the stuff to do it, you're totally going to get up and make yourself a bag of ice cream!)
P.S. It got a big thumbs up from my man so that means it really is as good as I'm saying it is.
You'll need:
3/4 cup Silk French Vanilla Non-dairy creamer
1/2 cup Original Soymilk (or you could use vanilla soymilk)
1 to 1-1/2 Tbsp Sugar, depending on your sweet tooth
1/3 cup table salt (yes I said CUP)
real vanilla extract
some ice cubes
1 gallon size ziplock bag
1 sandwhich size ziplock bag
a kitchen towel
1 bowl, 1 spoon, and your happy face :)
First, pour the creamer, soymilk, and sugar into your bowl and stir till mixed. Add in a small splash of vanilla extract and stir again. (You don't need much because of the creamer)
Pour the entire mixture in to your sandwhich bag and zip it tight. Fill half your gallon size bag with ice and pour all the salt over the ice. Close and shake to coat the ice. Open the gallon bag and put the sandwhich bag in. Zip tight again.
Wrap the bag in the towel (so you don't get frost bite, haha) and continuously shake the bag for 7 minutes. Open the bag to check and make sure your cream bag is frozen. If you want a thicker consistency, close and shake an additional 1-2 minutes. Do not take the cream filled bag out before you are ready to eat it.
If you're feeling really naughty you can always make you husband shake the bag while you chop up some non-dairy chocolate chips to top your bowl off with! (I like Ghirardelli Semi-sweet and Guittard Semi-sweet, both of which are dairy and gluten free.)
You could also chop peanuts or almonds, or top it with whatever candy you happen to have lurking in your kitchen.
When you take your bag out you can eat it strait from the bag. No shame in that! Or you can push it out of the bag into your (rinsed out) bowl, top it with your chopped chocolate chips, and get ready for your happy face to appear!
Ah, the sweet taste of homemade icecream without the expensive icecream maker. Music to my ... taste buds :)
!!!Enjoy!!!

Tuesday, December 27, 2011

Pineapple Brown Sugar Christmas Ham

This is my recipe for the best Christmas ham ever! This year we weren't going anywhere so I only needed a 5 pound ham. It cost $17 at Walmart. I already had everything else at the house except the pineapple which was about $1.38 for the 20 oz can also at Walmart. You will also need whole cloves, 1 cup of brown sugar, 3 heaping tablespoons of cinnamon, and a few squirts of pure clover honey. (and tin foil and a pan of course :)

^Ham :)

^Mix up your brown sugar and cinnamon together and rub it all over the entire ham, heaping extra up on top after you've done the bottom, and pressing it into the ham lightly.

^Time for the cloves and pineapple!

^Put a small rack in a casserole dish (or whatever you're going to cook your ham in) so it sits up out of the juice just a little bit. You want the steam to circulate around the entire ham when it's covered and in the oven.

^This is why you piled extra of your brown sugar mixture on top. With one of these meat spearing thingy's (not sure what it's actually called...) poke holes in your ham all over the top about every inch or so. This pushes some of the brown sugar down in and allows the flavors and steam to get down inside the ham.

^After you're done poking your ham, take a large knife and score the top in a criss cross pattern. Put a whole clove in each section. You don't have to score very deep.

^Heap your pineapple on top, and pour the juices and the rest of the pineapple around the bottom of the pan. sprinkle the rest of your brown sugar mixture around the entire pan and on top of the pineapple topped ham. Squirt some honey around in the bottom of the pan. Cover your pan with tin foil. Your ham is now ready to cook. For this 5 pound ham I cooked it at 350 for 1 hour and 15 minutes. The directions said an hour and a half, but that was just too long and it was done before that.

^When your ham comes out of the oven, take a meat baster and use the juices from the bottom of the pan as a glaze, and put it all over the ham. Serve immediately. Enjoy :)

Monday, December 5, 2011

Chicken Enchilada Casserole (dairy- free & low carb options included)

Per the request of my mother-in-law, here is my Chicken Enchilada Casserole! Dairy free with a low carb option. Can't get any better than that. And it's easy, yummy, and quick too! NOW, you can't get any better than that! So whip this up for dinner and enjoy. Happy Cooking :)

Tortillas: (I prefer low carb whole wheat tortillas, but for my family I use Tortilla land brand that you buy the dough and cook it yourself. They are SSOOO much yummier than the regular pre-made ones you buy in the package.) Cook them.

1-2 cans of canned chicken, depending on your casserole/family size. I prefer chicken, but you could cook up some ground beef, or use shredded pork as well. Make sure it finely shredded, cooks better that way. Toss it with a bit of extra virgin olive oil and salt and pepper to taste, not too much though.

I think I used about 12 whole tortillas for this recipe and it fed my husband for days. (My kids won't eat the veggies and I made a smaller low carb one for myself) Rip them up in random pieces and lay them out in a layer on the bottom of your casserole dish. There's no need to spray or butter your dish.

For this particular casserole I used green chile enchilada sauce, I prefer the regular kind for myself though, mild. Spread a good layer on top of the tortillas. I used almost an entire can for one casserole. Spread it around evenly over the tortillas strips.

The next layers are the chicken and the cheese. Nice and thick with the cheese if you can. I only had one package of vegan cheese so my cheese layer isn't as thick as I would have liked it to be. In my opinion, the more cheese, the better!!

Sprinkle on some diced ripe roma tomatoes and chopped purple onion. This layer is optional, but my hubby LOVES both veggies, so I just had to add it.

Repeat those layers (tortilla strips, sauce, chicken, cheese, veggies) as many times as you would like, or till your casserole dish is almost full. Top the casserole with chopped veggies and cheese. Cover and cook about 20 minutes, then uncover and cook another 15 minutes to make the cheese a little crispy. Vwa la! In about 40 minutes you have a yummy dinner for your family. Enjoy :)


Saturday, December 3, 2011

Non-Dairy Chocolate Banana Cream Trifle

I made this dessert for the first time on Thanksgiving and I was really excited about it. I was a little nervous about how the non-dairy substitutions would make it taste, but it did not disappoint! So here's my non-dairy version of a yummy Chocolate Banana Cream Trifle.

*Side note* If you are making this dessert for a gathering and are worried about someone being allergic to bananas (like my brother is) then leave them out and it still makes a yummy dessert. I was also thinking about slicing strawberries and trying a Chocolate Strawberry Cream Trifle. Yum, huh? For a gluten free alternative try crushed brown sugar almonds in place of the graham crackers. That might be tasty :)

For this trifle you will need:
18 whole Honey Graham Crackers, crushed
1 cup vanilla Soy Milk
1 - 3.4 oz box Jell-O Brand French Vanilla Instant Pudding Mix
1 & 1/4 cup Ghirardelli Semi-sweet chocolate chips
2 containers SoyaToo Extra Heavy Whipped Cream
4 Lg Bananas, peeled and sliced
2 Tbsp 100% Lemon Juice

^1st, break up your graham crackers and crush them as best you can. Set aside.
^Next make your cream. Mix the Jell-O mix, the soy milk, and all but 1 cup of your whipped topping in a bowl and whisk together till smooth.
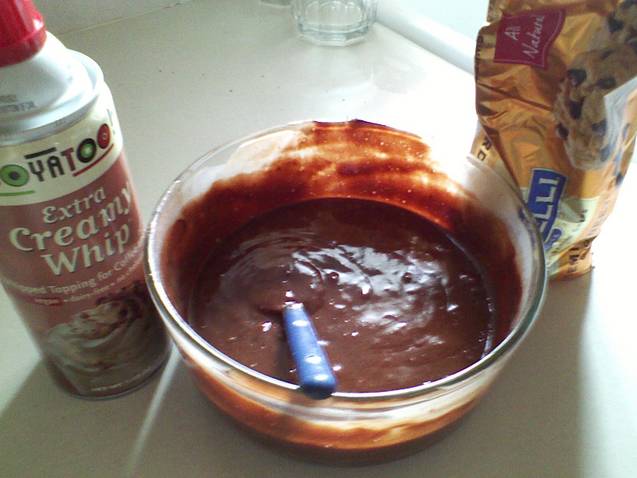
^For your ganache, microwave your chocolate chips in a glass bowl till smooth and add in that last cup of whipped cream.
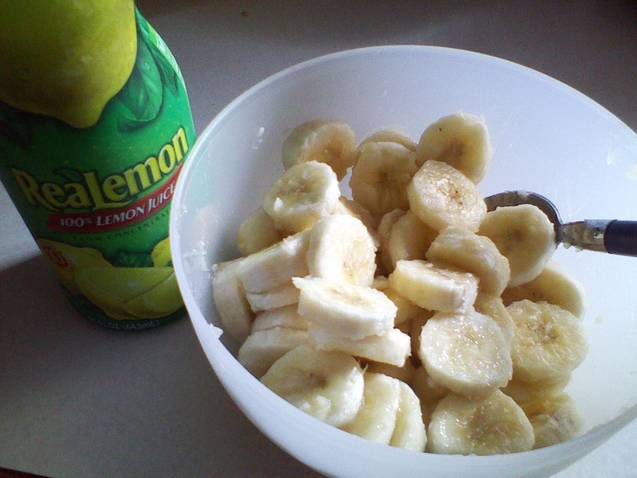
^Peel and slice your bananas. It's best to use bananas that are ripe for eating, but not to ripe so they are not as soft as a fully ripe banana. Place the slices in a bowl and toss with the lemon juice. THis keeps your bananas from browning. Set aside 12 slices for garnish.
^Next you start with your layers. Place half the graham crackers on the bottoms of the dish you will be serving from. I used a Trifle Dish, purchased for $6.97 at Walmart. Arrange a single layer of bananas on top of the crackers. I only had 3 bananas so my layer is thin, plus my hubby is not a big banana fan. You don't have to go so thin if you had all 4 bananas.
^Next, spread 1/3 of the chocolate ganache over the bananas and over the ganache spread half of the pudding filling. Repeat Layers. On top, decorate with the remaining ganache in a criss cross pattern, and sprinkle with the remaining graham cracker crumbs. Arrange the bananas you set aside in a circle for the garnish.
^Cover and chill for 2 hrs so your fillings can thicken and set. Serve cold and keep refrigerated.
Enjoy!