Thursday, April 21, 2011

Homemade Fried Chicken & Steak Fries

Today's Dinner is Homemade Fried Chicken and Steak Fries... made from scratch! This recipe is not for the faint hearted and takes quite a bit of prep work, but is totally worth it. Ready? Go!

You will need:
- 4 whole boneless, skinless chicken breasts, thawed
- 2-3 large eggs
- 2 gallon size ziplock bags
- 6 cups Pure Vegetable Oil
- 2 cups of all purpose flour
- 4 & 1/2 tsp sea salt
- 3 tsp chili powder
- 2 tsp onion powder
- 1 tsp garlic powder
- 1 & 1/2 tsp garlic salt
- 1 tsp black pepper
- 1/2 tsp ceyanne pepper
- 1/2 tsp thyme
- metal tongs or something alike
- wire splatter guard
- 2 plates and napkins

- 3 to 5 medium potatoes, depending on how big your family size is. 4 potatoes made enough fries for my family of 4.
- season salt
What to do:
-Once your chicken breasts are fully thawed, drain the juice and set on your meat cutting board. Cut into 1-inch strips and place back in the bag. In a small bowl beat 2-3 eggs (depending on what size they are) and add 1 tsp salt. Add that tho the bag you just put the chicken back in, close it and set it aside.
-In your other gallon size bag, combine flour and all seasonings. Close the bag nice and tight and shake it in all directions to mix all the seasonings together.


-Pour your oil into a large pot and slowly bring it up to about 365 degrees on medium heat. (optimal oil temp for frying chicken is 355-375 degrees) If you don't have a thermometer wait about 5-10 minutes and then try adding a small piece of bread to the oil. If it browns in less than 60 seconds then your oil is at the right temp. If not give it a few more minutes to heat and try another piece of bread.
-While you're waiting for the oil to heat up, peel your potatoes and cut them in half long ways. Slice them into about 1 in x 1 in strips as you see fit and set them aside.
-Slowly and carefully add your chicken one piece at a time and give it ample time to brown on the outside. If your oil is at the right temp, it should cook the chicken through by the time the outside is completely browned. When you take chicken strips out place them on a plate that has a couple of napkins/paper towels spread out on it (to soak up any excess oil) and let them cool before serving.
-Once all your chicken strips are cooked it's time to start your french fries. You can put your chicken strips in a container to keep in the heat, but allow some venting so the breading doesn't become moist to the point of loosing it's crispiness.
-Drop a couple handfulls of potatoes in the oil. French fries take longer to fry than the chicken does so be patient. It's worth the wait! When they start to float you are getting close. Let them start to get brown and then they are done. Pull them out with your tongs or a slitted scoop and set them on a plate covered with a napkin/paper towel like you did with the chicken. Allow to cool a minute or two and then serve everything nice and warm with Ketchup and BBQ sauce. I also love serving fried chicken with corn on the cob.

Good luck!

Friday, April 1, 2011

Easy Cheap (and dairy free!) Tostadas

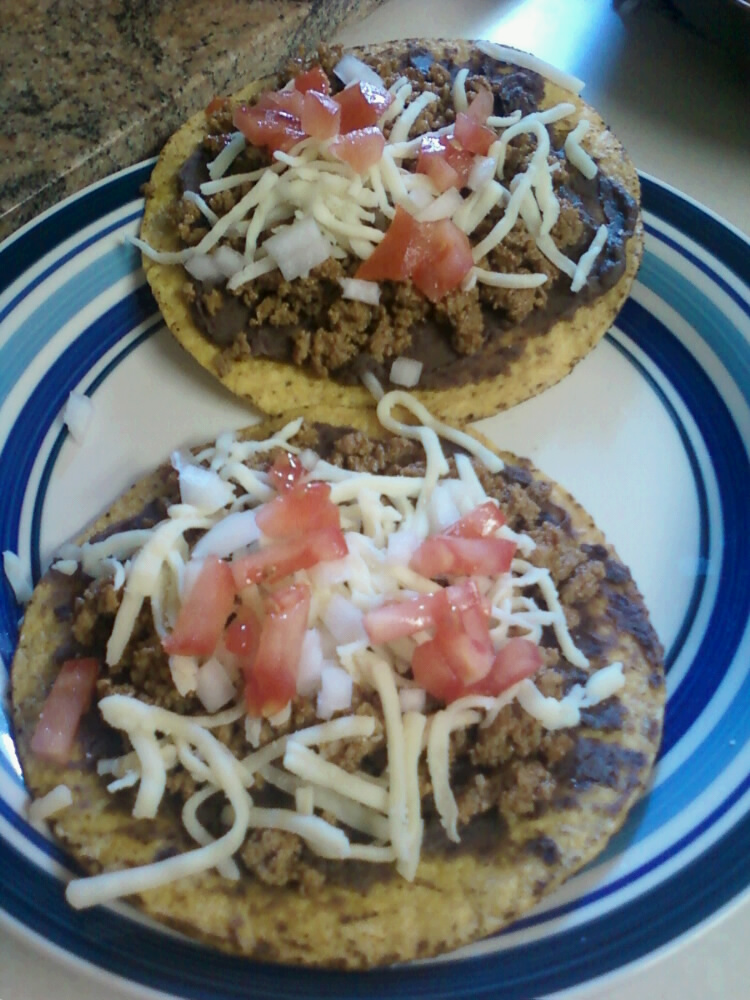
I'm one of those moms that is constantly on the go with tons of stuff to do during the day. With my oldest daughter starting school in August, I will be even more busy driving back and forth every day. So when it comes to cooking dinner in the evening I'm all for food that tastes good, doesn't take too much prep time, and is easy to make and cheap to buy. Actually, most of these ingredients you will already have in your fridge! These tostadas are fun for the kids (my oldest called it crunchy taco pizza) and easy for me so it's a win all around. I hope you enjoy them!

You will need:
1 or 2 pkgs Tostada Shells (Mexican Food section at your local grocery store, $.99/ea.)

1 Roma tomato (diced)

Shredded Cheddar Cheese (I used this and also had Veggie Shreds on hand for the dairy allergies in the family)

1 to 2 lbs ground turkey burger (you can also use ground beef or shredded chicken may even work), depending on the size of your family or your husband's appetite

Taco seasoning, 1 packet per 1 lb of meat or however much it says to use on the container

Tofutti Brand Regular Imitation Sour Cream-
dried chives, mayonaise, nutritional yeast, onion powder (for the cream cheese to make dip for a topping)

1/2 a medium green bell pepper, chopped (I was out at the time so there's none in the picture, but it makes a great topping)

1/2 a small white onion, chopped

Your favorite salsa and/or hot sauce (i.e. my hubby loves Tobasco)

1 can plain black beans (and a pot to cook them in)
salt and pepper (for the beans)


Cook your meat til fully brown and season w/ the Taco seasoning according to your taste and set that aside.

Next, empty your can of beans into a pot on the stove and let it come to a good solid boil. Once it's boiling, drain and rinse the beans and put them in your trusty food processor with plentiful salt and pepper to taste. (I'd say about a 1/2 tsp of pepper and salt both) Grind them up really well. If the bean paste is too thick for your liking, add a little bit of water at a time till you get a consistency you're happy with.

For your Tofu Sour Cream dip, empty the entire container of sour cream into a bigger bowl (not huge, but bigger than the container so you can stir things in without making a mess) and add two whopping tablespoons of Mayo. Stir that in well. Add a few pinches of chives, about a small tsp of onion powder and a couple tsp of nutritional yeast. Stir that all together and there is your dip, simple and easy.

Prepare all your veggies and set everything out in a salad bar fashion. Let your family go to town and make their own "crunchy taco pizzas" that they will totally love. This recipe can have plenty of dairy, or none at all which is wonderful and it is low cost and easy to whip up in a short amount of time. I'd say a total prep and cook time of less than a half hour.

*Health conscience moms... one tostada shell has only 10g of Carbs so feel free to go a little crazy!

Thursday, March 10, 2011

Easy Non-dairy Mock Turkey Stroganoff

Of course I forgot to take a picture of the finished product so all I have is words to go off of. So sorry, but you should try this one out anyway! This is an easy recipe (created by me) because my husband and two daughters are all allergic to dairy. When I was younger my dad would make beef stroganoff (the good ol' fashioned kind w/ dairy) all the time and I used to love it. I've improvised and made a yummy turkey pasta that I like to call "Mock Turkey Stroganoff" and my kids and husband love it. So here it is, enjoy!

You will need:
1.) 1 box of your favorite pasta, cooked (i use garden rotini because I like to think it's healthy)
2.) 3 cups water (if you have pre-made beef broth that will work fine)
3.) 3 tsp beef bullion granules/base or 3 beef bullion cubes
4.) 1 lb turkey burger, cooked and seasoned
5.) 1 cup water in a mug or cup for stirring
6.) Cornstarch

Once your pasta and turkey burger are cooked add your turkey burger to the pan with the pasta and stir the two together. Place your water and beef granules/cubes/base in a medium sauce pan over medium heat till mixed well. In your mug or stirring cup add 2-3 heaping tablespoons of cornstarch and stir together till you have a thick milky looking mixture. Slowly add this (1/4 cup at a time) and stir well. You will have to continue stirring this all the while you're mixing it together because it will get thick pretty quickly. *The reason I do it this way is because I always seem to get a clumpy beef gravy instead of a smooth one and this helps to keep out the clumps.

Once you have a nice thick gravy (not pasty thick, but thicker than normal gravy thick) then pour it over your noodles and turkey burger and mix well. You should use the whole mixture to coat the noodles well enough. See how easy that was? You don't have to add anything else. I usually serve this with some sort of veggie on the side and maybe some garlic toast or something like that. I hope you enjoy this non-dairy creation :)


Monday, February 21, 2011

Sausage Substitute

Have you ever had a breakfast or dinner recipe that calls for ground sausage or sausage patties, but you currently have none in the freezer? "Why do I not keep this stuff on hand?" you ask yourself... because it is so ridiculously high in fat that it grosses you out, and has artery clogging properties is why. Which is why I did some research and formulated my own "sausage substitute" that will work in any recipe that calls for sausage, but has less than half the fat and skips on that rubbery texture we all hate. It also tastes wonderful and is quite good for you. It's pretty darn simple too, so here it is.

You will need:
1 lb ground turkey (I like the Jenni-O brand)
2 cloves of garlic (1 clove of garlic is equal to 1 tsp of garlic powder, in case you were wondering)
1/2 tsp paprika (optional)
1/2 tsp dried Oregano
1/4 - 1/2 tsp all natural sea salt
1/4 - 1/2 tsp ground black pepper
1/8 tsp thyme (essential)
1/8 tsp fennel (you can substitute Cumin or Dill for this if you don't have any)
1/8 - 1/4 tsp onion powder (i use dried minced onions and double the amount bc my husband loves onions, you don't have to though)
1/8 tsp dried savory (you can substitute rosemary or any ground citrus spice for savory)
1 tbsp Extra virgin olive oil

All you do is put your thawed turkey burger in a bowl and add all the other ingredients and mix it together well. (hands work best, it's gross, but that's what soap and water are for) Divide into four sections and form into patties (or throw it into your frying pan directly after mixing for ground) and fry until cooked through. Enjoy :)

Sunday, February 20, 2011

Family Restaurant Recommendation

We got our tax return back a few weeks ago and my husband was allowed $500 for repairs on his car. He didn't spend all of that and wanted to take me out on a date. We went to GoodWood BBQ in Orem for dinner. I know I said "Family" recommendation, but this is a great establishment that the whole family could enjoy, not just a couple on a date. I ordered their double battered chicken fingers (best chicken fingers I've tasted in my 23 years) and for dessert I had this:
Chocolate Fudge Brownie topped with Light Vanilla Bean Ice Cream, whipped cream, Low-fat Chocolate Ganache, and of course a Cherry on top!
Most delicious dessert ever!

Their menu is a wide variety of all classic favorites like the chicken I ordered, some house specialties, and then they have all your basic soups and salads, some awesome appetizers and adult drinks/wines/beer, and more delicious goodness such as desserts like the one above. I've also had their chicken fried steak, and my husband liked their brisket.

I've been doing really well with my New Years Resolution to not eat any candy or drink any soda, and I figured it was time to treat myself. (The only sweets I've had all year are 2 glasses of hot cocoa, 2 sugar cookies the other day, and a few chocolate chip cookies last month.) So I don't feel too guilty about consuming, oh say 2000 calories in one meal. haha The food tastes great, the servers and hostesses are very nice and their service is very fast and professional, and it is a warm inviting environment to enjoy dinner with your family. You should all try GoodWood BBQ in Orem!

Thursday, February 10, 2011

The Best Broccoli Stir Fry

I know most of you are going to look at the title of this entry and think, "Broccoli, seriously?" and if I were the outsider (which I usually am) I would say the same thing. I can't stand broccoli; the taste, the texture, the smell... honestly it makes me gag. I never cook it for my husband, who loves it, because I can't stand the smell. I happen to have found a way last week, confirmed last night when I made it for the second time and it turned out "amazing" in the words of my husband, to cook broccoli and not be overcome by the smell. Wanna know my secret way? Keep reading :)

It's a stir fry! Two yummy green vegetables and some onions in a skillet with some other ingredients. Broccoli stir fry, who would have thought? You will need:
-Large non-stick skillet or wok
-1 large stalk of broccoli
-1/2 a small onion
-1/2 a large green bell pepper
-extra virgin olive oil
-liquid aminos (click here if you have no clue what liquid aminos is)
-healthy pinch of garlic powder or 1 small clove of crushed garlic
-ground pepper

-All you have to do is cut your broccoli into pieces as you would if you were going to steam it and throw it in the skillet. *Chop off the stem at the bottom of the largest pieces and begin to chop the individual stalks off. Work your way up the stem until you have nice, small pieces of broccoli.
-Slice your onion in half and pull out the heart and set aside. Slice through the layers of onion so you have half onion circles. Throw those into the skillet.
-Slice your bell pepper top and bottom and pull out the core. Cut the pepper in half from the open top, and slice one half long ways in thin slices. Throw those into the skillet. Turn your stove top on medium heat.
-Pour olive oil (the equivalent of about 4-5 tbsp) on top of your veggies and stir together well.
-Squirt a few tsp worth of liquid aminos onto your veggies and stir again.
-Add your garlic and pepper and stir again.
-Cover your skillet or wok with a large lid and allow to sit and steam for a minute or two. Uncover and stir well the recover for another minute. Uncover and stir around for a minute. It should smell REALLY good. Let it sit uncovered and stir occasionally. Total cook time about 5-7 minutes depending on how many veggies you added to your skillet. In the middle of cooking (it's really cool to watch) the veggies will start to turn a darker and brighter shade of green and then you know you're almost done. It's a beautiful color!

See? Broccoli can smell AND taste really good :)
*the picture has a really small amount in a large skillet. last time this skillet was very full. both nights the veggies turned out yummy, but this stalk of broccoli happened to be quite a bit smaller than the last one i used. just thought i'd let you know incase you were wondering why there was barely anything in there :)

Sunday, January 16, 2011

How to Spice Up Frozen Taquitos

When I go grocery Shopping I always buy the 60 pack of frozen chicken taquitos for those nights when I don't feel like going all out on dinner. A couple of weeks ago I was wondering how I could turn these taquitos into a worth while meal that my husband would love, so in this post I'm going to share what I did that my husband did, in fact, love.
For my family of four (well, three and a half) I cooked 30 in the oven. The tops and ends get a little crispy when you bake them instead of cook them in the oven. And DON'T fry them! Ruins the flavor and adds a terrible amount of fat. I mean, if you don't care, you can fry them, but I don't like that :)

You will also need:
1 can of refried beans, some of your favorite salsa or picante sauce, shredded cheese, and sour cream or sour cream dip. (the chive and onion is really good) Want to make your own? See the note at the bottom.

So all you do is cook the taquitos and the beans. Then put 6-7 cooked taquitos on a plate and smear refried beans all over them, top them with plenty of salsa, shredded cheese, and a dollop of sour cream on top. (We used tofu cheese and sour cream, a great alternative) Easy, but can you say tasty? I used to just serve these with salsa for dipping and maybe some cheese shreds, but this is so much better!

*A tip for you if you're not a refried beans fan. Substitute one can of black beans, cook all the contents of the can then drain and blend together well in a food processor. You can stop there, but I like to add a little bit of salt and pepper as well.

Note: To make your own chive and onion cream cheese mix 1-8 oz container of cream cheese with 1 tsp garlic powder and 2 tbsp of dried chives and vwala! Chive and Onion Cream Cheese w/out the hassle of the store not having the flavor you want.